Having to use a printer for several computer systems has always been a disturbing issue in the hearts of many. Therefore, many think they are supposed to buy several other printers for each computer.
This shouldn’t be the case because most printers can be shared by more than one computer system. A printer that can serve multiple computers should be one of the things you look for when buying a home printer.
In this article, we will show you how to share a printer on a home network. We will reveal this in very easy to follow steps. You don’t need printers for your computers; one printer can rule them all. (Lord of the Rings’ style).
There are two methods you can use to share a printer on a home network. You can choose to do so with or without a homegroup.
We’ll begin with how to share your printer without a homegroup as it is the commonly used method. After that, we’ll discuss how you can share your printer using a homegroup.
Table of Contents
Sharing Your Printer without a HomeGroup — Method 1
In this method, there are three parts:
i. File and printer sharing set up
ii. Sharing the printer
iii. Adding your printer
File and Printer Sharing Set Up
Before you can get started with the process you must make sure you set up your printer’s file and printer sharing. Once that is done, you can then follow the step by step procedure.
Below are the steps to follow to successfully achieve the sharing process.
Step 1: Click the Windows Start Button
This button is found on the left-bottom edge of your Windows menu bar. When you click on it, the list of programs will pop up.
Step 2: Click on Control panel option
Click the control panel option from the list of programs that appear. It can be found on the right side of the list pane.
Step 3: Type “network”
After the control panel window opens, go to the search box at the top of the screen and type “network”.
Step 4: Click Network and Sharing Center
The search made in step three will display certain results. Among the results, you will find “Network and Sharing Center”. Click on it to continue.
Step 5: Select Change Advanced Shared settings
On the left panel of the current window, click “Change Advanced Shared Settings”.
Step 6: Click the down arrow.
This action will cause the network profile to expand.
Step 7: Click File and Printer Sharing
Once the network profile expands, click “File and printer sharing”. Then select “Turn on File and Printer Sharing”.
Step 8: Click “Save changes”
This will complete your file and printer set up.
Note: This is not the final step for sharing your printer on a home network; this is just setting up file and printer sharing.
Once you have completed this stage, you will still have to perform the next series of steps.
Sharing your Printer
Step 1: Open the Windows Start Menu
This button is found on the left-bottom corner of the Windows menu bar. When you click on it, a list will pop up.
Step 2: Click “Devices and Printers”
From the list of programs that appear, click “Devices and Printers”. It can be found on the right side of the list pane.
Step 3: Click on your printer
When you click “Devices and Printers” in step 2, you’ll be shown a list of printers. From this list, select the printer the intend sharing.
Step 4: Click “Printer Properties”
You will see a dropdown list after step 3. Then click the “printer properties” tab.
Step 5: Click “Sharing”
The next thing to do is to click on the tab labeled “sharing”.
Step 6: Click “Share this printer”
A checkbox will appear beside a “share this printer” option. Select this checkbox.
You’ve successfully shared your printer.
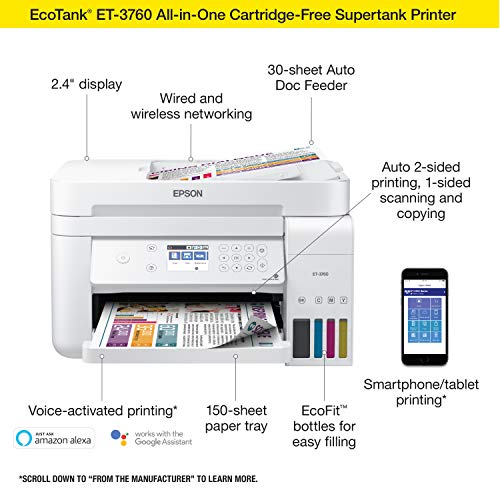
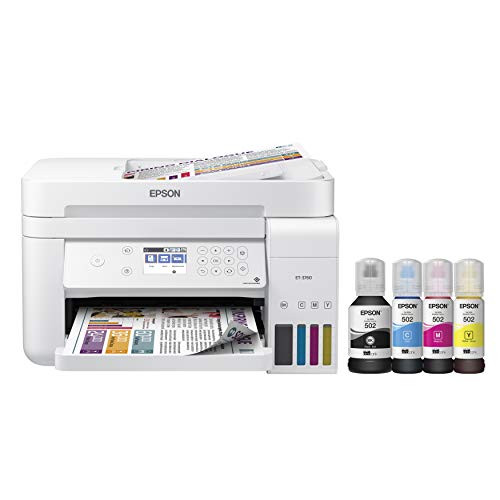
If you are looking for a home printer that is eco-friendly, we recommend the Epson EcoTank ET-3760 is a fantastic choice.
Video: How to Share a Printer on a Home Network
Learn how to share a printer on network on Windows 7, 8 & 10.
Adding Your Home Network Printer to Your Computer
The steps above in part 2 do not mean you’ve added your printer to your computer. It only means other computers can now connect to your printer.
To add your computer to your home printer, follow the steps below.
Step 1: Open the Windows Start Menu
This button is found on the left-bottom corner of the Windows menu bar. When you click on it, a list will pop up.
Step 2: Click “Devices and Printers”
Go through the list of programs that appear and click “Devices and Printers”. It can be found on the right side of the list pane.
Step 3: Click “Add a printer”
Step 4: Click “Add a network, wireless or Bluetooth printer”
Step 5: Click on the printer you shared.
Step 6: Click on the “Next” button.
Click “Next” and follow the on-screen instructions to complete the process.
Your computer is now connected to your Home network printer and is ready for use.
For a more detailed article on how to add a printer, click here for Windows 7 and click here for Windows 10.
To read more awesome articles, click any of the links below…
How to Print Poster Size on Home Printer
What Can You Make With a 3D Printer at Home — 43 Cool Ideas
How to Print Gold Ink From Home Printer — 2 Proven Methods
How to Buy a Printer for Home Use — 12 Factors to Consider
Sharing Your Home Printer Using a HomeGroup — Method 2
To use this method, your home printer should have been added to a computer system beforehand. Here’s another reason you need to read the articles we linked above.
At this point, we will assume you’ve added your printer.
One other thing, some computers may not have the homegroup app installed. If this is your case, you will need to download and install the app first.
Creating a HomeGroup
For other computers to share a printer, a HomeGroup must first be created. To do this, follow the steps below:
Step 1: Click on the Windows Start Button
This button is found on the left-bottom corner of your Windows menu bar. When you click on it, a popup list will be revealed.
Step 2: Type “HomeGroup”
In the search box, type “HomeGroup”. Once the results show, select the Homegroup app.
Step 3: Click “Create a homegroup”
At the bottom of the HomeGroup window, you’ll see a button labeled “Create a homegroup”. Click on it to continue.
Step 4: Click “Next”
You’ll be shown some information about HomeGroups. Click on the “Next” button to proceed.
Step 5: Select “Shared” for the files and devices you want to be shared.
A list of files and devices will appear. On the left of these items, there are drop-down menus that give sharing permissions.
Select “Shared” for the files and devices you want to be shared. “Printers & Devices” is usually last on the list.
Once you have made the selections, click “Next” to go ahead.
Step 6: Input Password
The next window will require you to set up a password for your HomeGroup. This password is used to connect other computers to the HomeGroup.
Write this password down and click the button labeled “Finish” to complete the setup.
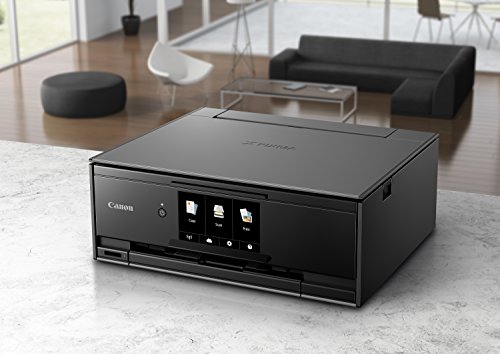
There are quite a number of printers that will readily work with HomeGroup and can print from anywhere. Our recommendation, however, would be the Canon TS9120.
Connecting Other Computers to the HomeGroup
Once the HomeGroup is created, follow the steps below to connect other computers to the HomeGroup.
Step 1: Click on the Windows Start Button
This button is found on the left-bottom corner of your Windows menu bar. When you click on it, a popup list will be revealed.
Step 2: Type “HomeGroup”
In the search box, type “HomeGroup”. Once the results show, select the Homegroup app.
Step 3: Click “Join now”
The action in step 2 will open the HomeGroup settings window. Click on “Join now” which will open the next window.
Step 4: Click “Next”
You’ll be shown some information about HomeGroup. Click on the “Next” button to proceed.
Step 5: Select “Shared”
You’ll be shown sharing settings with different files and devices. Click the drop-down arrow beside “Printers & Devices”.
Then select “Shared” to give permission for sharing options and click “Next” to continue.
Step 6: Type in the HomeGroup password
The next window will require you to input the HomeGroup password. Type in the password and click “Next”.
Step 7: Finish the process
The next window will tell you that “you have joined the homegroup”. Click “Finish” to end the process.
You can now use your home network from this new computer system.
Final Words
Many computer systems can successfully share one printer. Especially in a home, it is not penny-wise to spend on different printers when everyone can make use of just one.
Which of the methods are you going to use or have you used? We’ll like to hear from you. Also, if you have further questions, please let us know in the comments section below.